How to Record Your Screen or Webcam Using VLC Media Player – Step-by-Step Guide


Asif Mohammad Sovon
Asif Mohammad Sovon, IT Assistant at Bangladesh Air Force and Fileion tech writer, simplifies tech t...
Step-by-Step Guide: How to Record Your Screen
3. Core Action Step: Recording the Screen
Step-by-Step Guide: How to Record Your Webcam
2. Core Action Step: Recording the Webcam
Quick Tips for Better Recordings
Q1: Can VLC record my screen and webcam at the same time?
Q2: Why is there no sound in my screen recording?
Q3: Where does VLC save the recordings by default?
Ever needed to record a quick tutorial for a friend or capture a video call, but realized you did not have recording software installed? Most people do not realize the solution is already on their computer. VLC Media Player is famous for playing almost any file format, but it is also a powerful recording tool.
Recording your screen or webcam is essential for remote work, gaming, or creating educational content. Instead of buying expensive software or using tools that leave unpleasing watermarks, you can use a program you likely already trust. This guide will show you how to unlock these hidden features.
In this guide, you will learn how to set up VLC for screen and webcam capture, optimize your settings for the best quality, and save your files correctly.
Let’s dive into the basics before moving to the hands-on steps.
What is VLC Media Player?
VLC Media Player is a free, open-source multimedia player developed by the VideoLAN project. While most people use it to watch movies, it is actually a versatile "Swiss Army knife" for video. It can convert files, stream content over a network, and capture live input from your hardware.
Students, educators, and professionals use VLC for its simplicity and low system requirements. It can record your entire desktop or a live feed from your connected camera. Because it is open-source, there are no hidden fees or "pro" versions required to access recording features.
Key Features
-
No Watermarks: Unlike "free trial" recording software, VLC does not add logos to your videos.
-
Resource Efficient: It uses very little CPU power compared to heavy recording suites.
-
Highly Compatible: You can save your recordings in MP4, WebM, or TS formats.
-
Privacy-Focused: Since it works offline, your recordings stay on your local hard drive.
-
Custom Frame Rates: You can choose how smooth your video looks by adjusting the frames per second (FPS).
Step-by-Step Guide: How to Record Your Screen
1. Getting Started
Before you begin, ensure you have the latest version of VLC Media Player installed on your device. Having the updated version ensures you have the most stable codecs for video encoding.
You can download the latest version of VLC Media Player from Fileion to get started.
2. Initial Setup
To make recording easier, you should enable the "Advanced Controls" in the VLC interface. This adds a dedicated record button to your player.
-
Open VLC Media Player.
-
Click on the View tab in the top menu.
-
Select Advanced Controls.
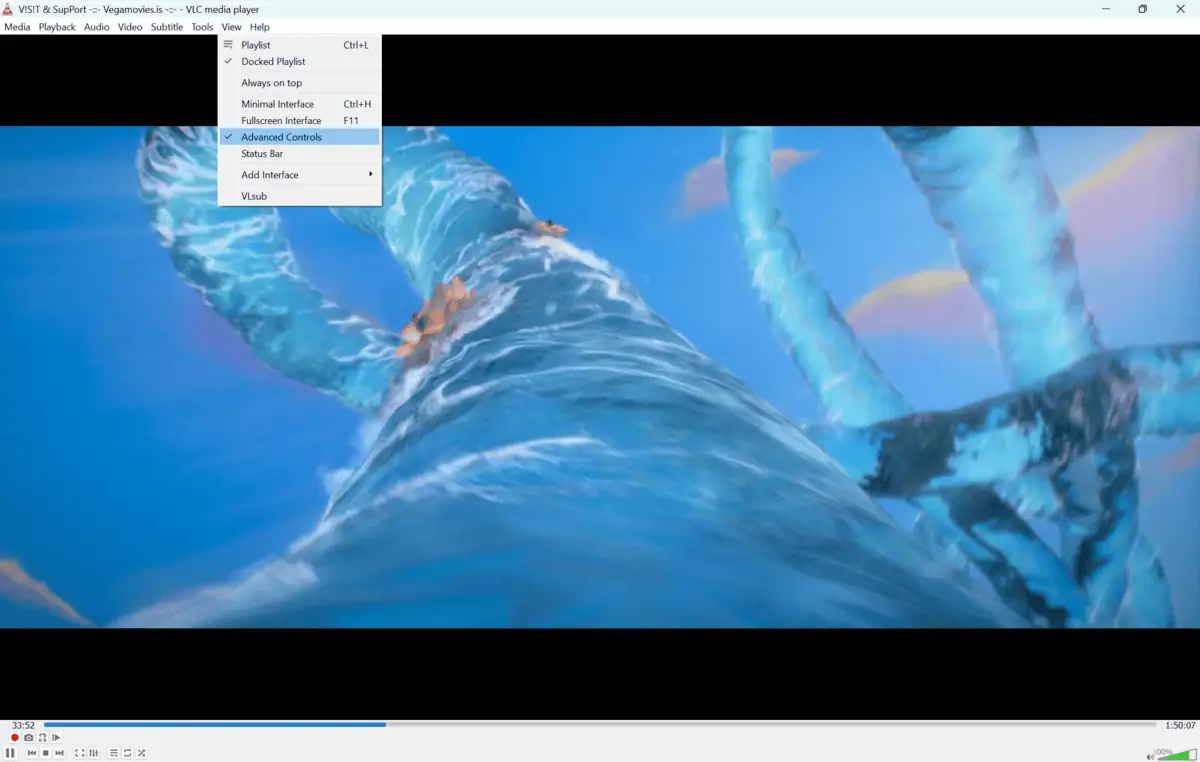
-
You will now see a red circle button above the standard Play/Pause buttons.
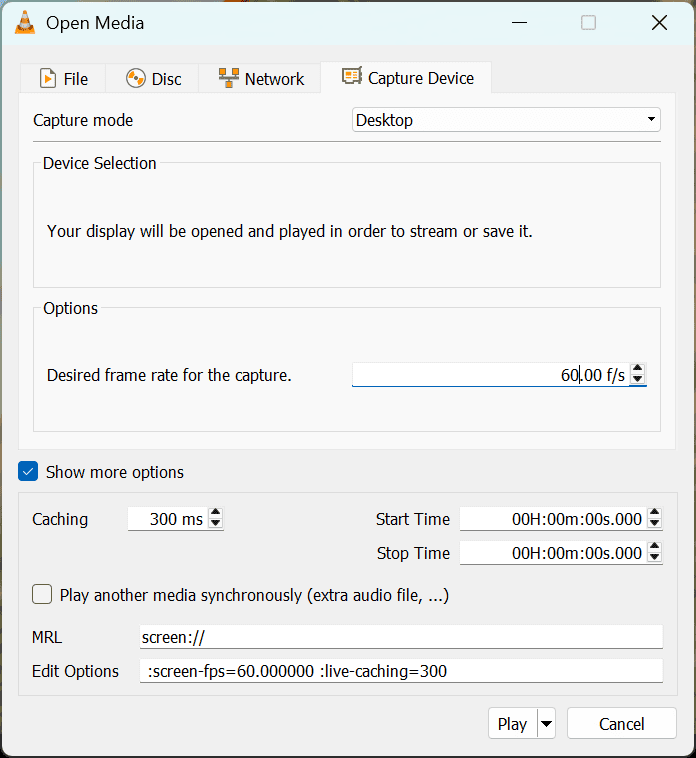
3. Core Action Step: Recording the Screen
-
Go to the Media menu and click Open Capture Device.
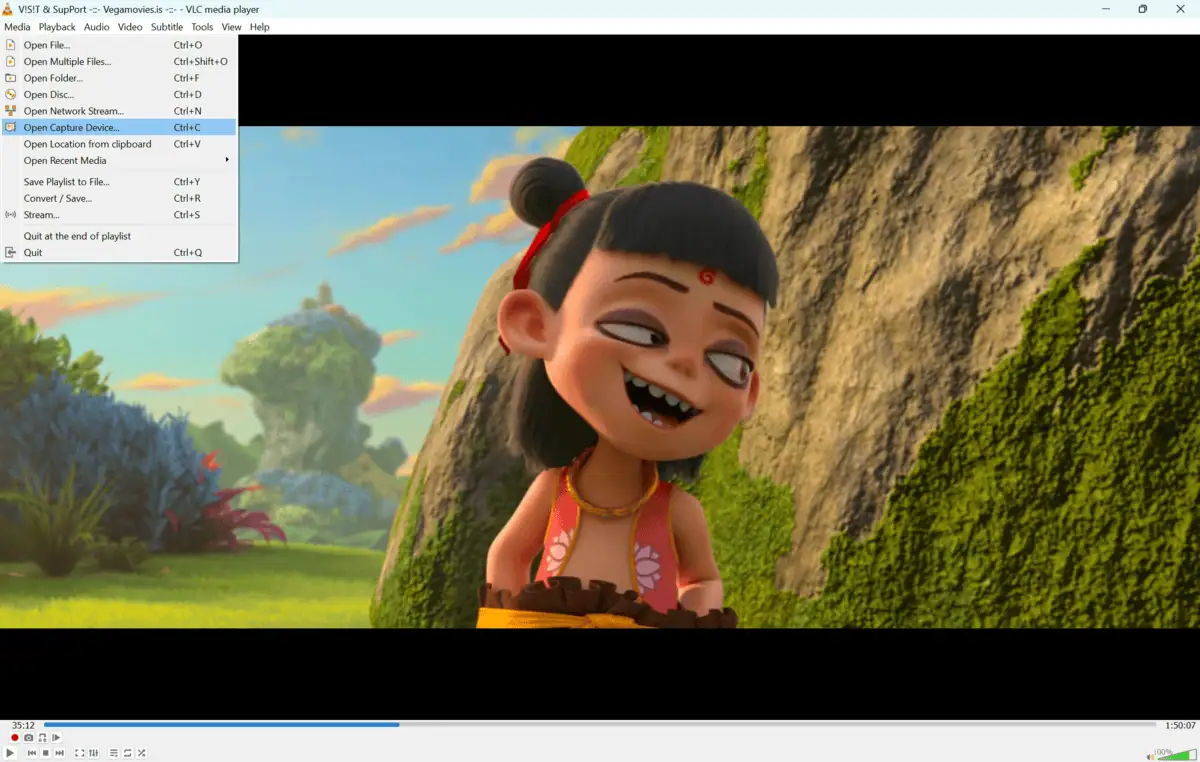
-
In the Capture mode dropdown menu, select Desktop.
-
Set the desired frame rate. For a smooth video, change this from 1.00 f/s to 30.00 f/s or 60.00 f/s.
-
Click the small arrow next to the Play button at the bottom and select Convert.
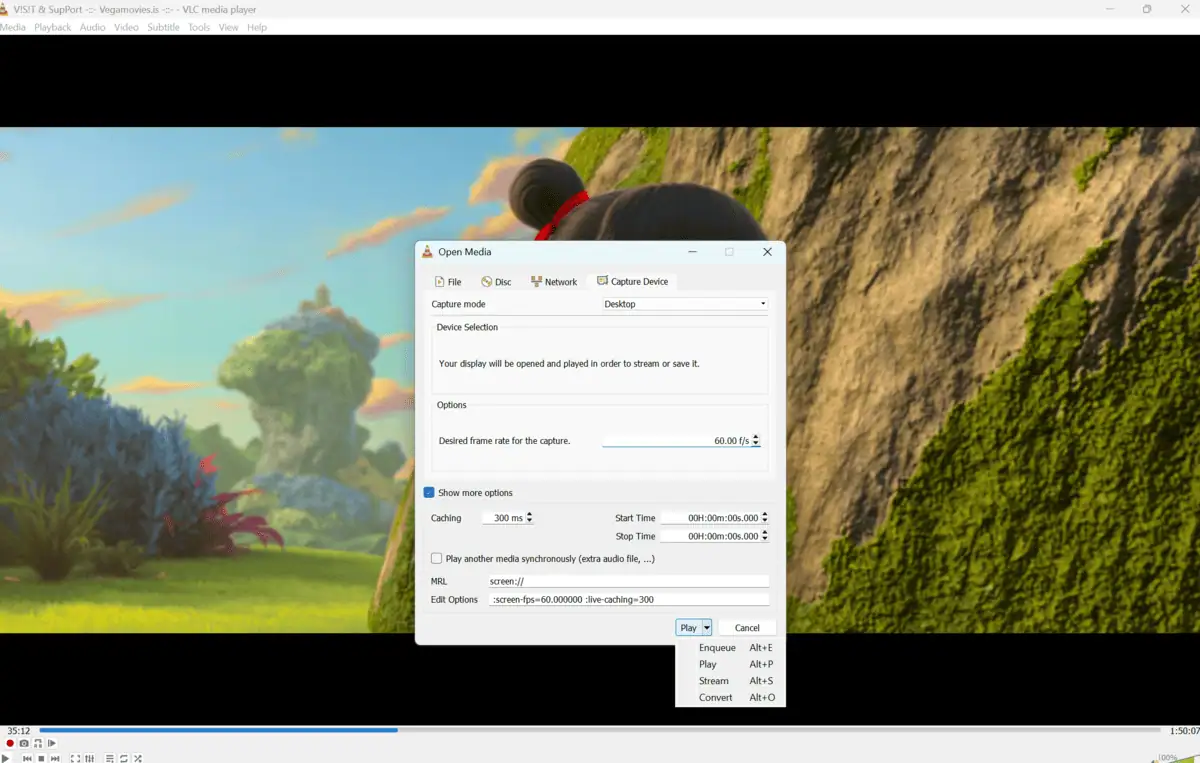
-
In the Profile section, choose Video - H.264 + MP3 (MP4). This is the most compatible format for all devices.
-
Click Browse to choose where to save your file and give it a name.
-
Click Start. VLC is now recording everything you do on your screen.
4. Finalizing and Saving
When you are finished recording, click the Stop button in the VLC playback controls. The file will automatically save to the folder you selected in the previous step. Navigate to that folder to view your MP4 file.
Step-by-Step Guide: How to Record Your Webcam
1. Getting Started
Ensure your webcam is plugged in and recognized by your operating system. Close other apps like Skype or Zoom that might be using the camera, as VLC cannot access it if another program is already using it.
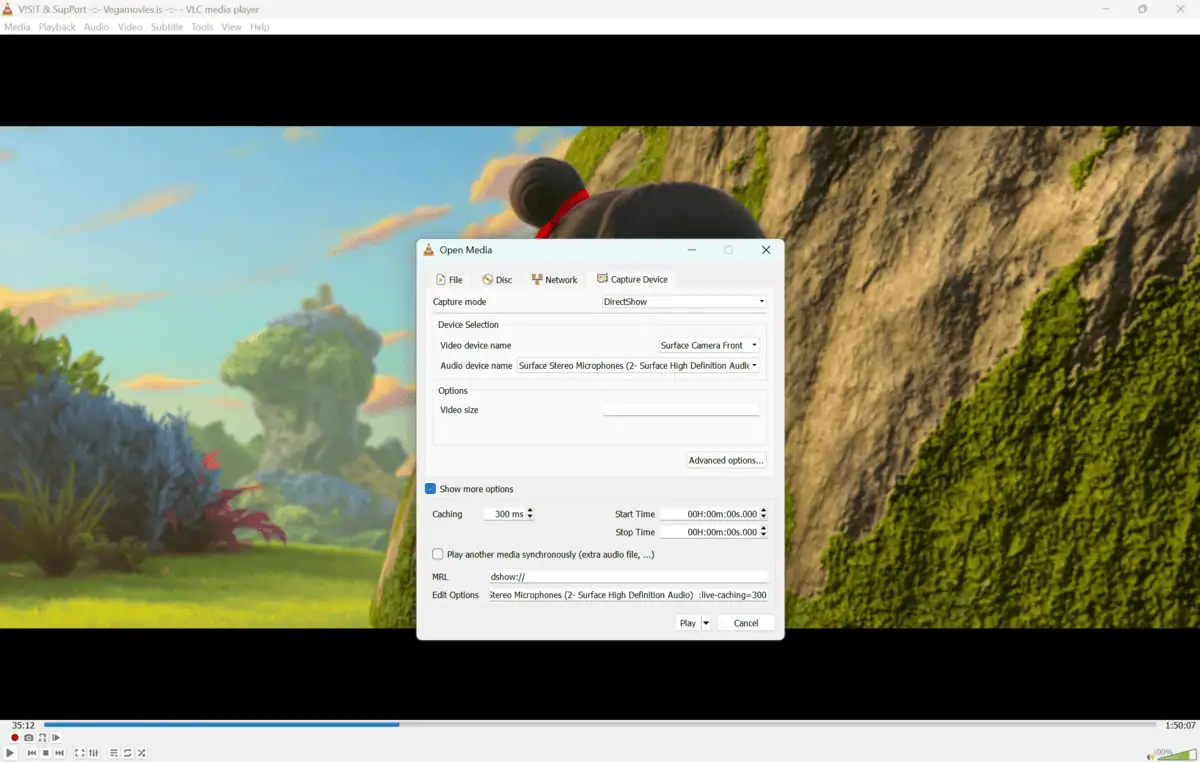
2. Core Action Step: Recording the Webcam
-
Go to Media > Open Capture Device.
-
Set Capture mode to DirectShow.
-
For the video device name, select your webcam from the list.
-
For the Audio device name, select your microphone.
-
Click Advanced options to set the aspect ratio (like 16:9) manually.
-
Click the arrow next to Play and select Convert.
-
Choose your profile (MP4 is recommended) and set a destination file.
-
Click Start.
Quick Tips for Better Recordings
-
Clean your Desktop: Before recording your screen, hide your desktop icons and use a neutral wallpaper for a professional look.
-
Check Audio: If you are recording a webcam, do a 10-second test run first to make sure your microphone volume is correct.
-
Keyboard Shortcut: You can often use the Spacebar to pause and resume the recording process if you have the window active.
-
Lower Resolution: If your computer is lagging, lower the capture frame rate to 24 f/s.
Common Mistakes to Avoid
-
Default Frame Rate: Many beginners leave the frame rate at 1.00 f/s. This results in a video that looks like a slideshow. Always set it to at least 30 f/s.
-
Audio Sync Issues: Recording the screen in VLC sometimes struggles with system audio. You may need an "Audio Virtual Cable" if you want to record both the screen and the computer's internal sound.
-
File Name Extension: When choosing a destination, always type ".mp4" at the end of your file name. If you don't, VLC might save a file that your computer doesn't know how to open.
Pricing and Availability
VLC Media Player is 100% Free. There are no subscriptions, no ads, and no premium features locked behind a paywall. It is available for:
-
Windows (10, 11, and older)
-
macOS
-
Linux
-
Android and iOS (though recording features are primarily for desktop versions)
Final Verdict
VLC Media Player is more than just a video player; it is a reliable, free tool for capturing your digital life. While it doesn't have the fancy editing features of high-end software, it is perfect for quick, high-quality recordings without any cost.
Whether you are a student making a presentation or a professional recording a bug for tech support, VLC is a tool you should have in your kit.
FAQs
Q1: Can VLC record my screen and webcam at the same time?
Ans: Standard VLC does not support "Picture-in-Picture" recording (showing your face in the corner of a screen recording) natively. For that, you would need more advanced software like OBS Studio.
Q2: Why is there no sound in my screen recording?
Ans: VLC's screen capture mode is designed to capture visual data. To capture audio at the same time, you must check the "Show more options" box in the capture menu and tick "Play another media synchronously" to select an audio input.
Q3: Where does VLC save the recordings by default?
Ans: If you use the "Record" button from Advanced Controls, the files are usually saved to your Windows "Videos" folder. If you use the "Convert/Save" method, the file goes wherever you choose during the "Browse" step.
Q4: Is the recording quality good enough for YouTube?
Ans: Yes. If you set the frame rate to 60 f/s and use the H.264 codec, the quality is high enough for professional platforms like YouTube or LinkedIn.
Q5: Does VLC work for recording gameplay?
Ans: VLC can record gameplay, but it is not optimized for it. High-end games may experience "stuttering" in the recording. For gaming, dedicated GPU software like Nvidia ShadowPlay is usually better.
Comments
Let us know about your thoughts
Explore more articles related to VLC Media Player
Here you will find all the latest tips and tricks about VLC Media Player. Also you will get many solution of problems which you may face while using this app.

Published at: Jan 04, 2026
How to Add Subtitles in VLC Media Player – Step-by-Step Guide
You finally sit down to watch a great film, but the dialogue is hard to hear,...

Published at: Jan 04, 2026
How to Stream Videos Online with VLC Media Player – Step-by-Step Guide
Most people use VLC Media Player to watch videos already saved on their hard drives. But...

Published at: Jan 29, 2026
How to Use VLC Equalizer: Best Audio Settings & Custom Preset Guide
Ever feel like your favorite movie sounds flat or the dialogue is hard to hear? This...

Play anything. Anywhere
VLC Media Player is a free and open-source, cross-platform media player software and streaming media server developed by the VideoLAN project. VLC is available for desktop operating systems and mobile platforms, such as Android, iOS and iPadOS.